Steven JW Kennedy

My Blog

Archive for the ‘Google’ Category

SP&GM: Step Four – Upload the JavaScript file

Posted by Steven Kennedy on April 18, 2011


Previous post in series: SP& GM: Step Three – Create a new Web Page and add a DataView

Next post in series: SP&GM: Step Five – Add a Content Editor web part [to be posted]


At the end of this post is the example JavaScript that I used to generate the Google Map. There’s also a link to a file with the code. Either copy or download the code and create a text file with it in. Don’t forget to replace the text, in the example code, ‘<insert your own Google Maps API key here>’ with your own Google Maps API key.

Upload the resulting text file to SharePoint. You can choose where you want to save this file to, a special Document Library for JavaScripts perhaps? In my case I just put it in the same Document Library as I’d created the web part web page. Once uploaded you’ll need to make a note of the URL for the file. I usually select the file and then select ‘View Properties’ from the dropdown. In the resulting properties display I right click on the name of the file and select ‘Copy shortcut’.


Previous post in series: SP& GM: Step Three – Create a new Web Page and add a DataView

Next post in series: SP&GM: Step Five – Add a Content Editor web part [to be posted]

Posted in Google, SharePoint 2010 | Tagged: , | Leave a Comment »

SP&GM: Step Three – Create a new Web Page and add a DataView

Posted by Steven Kennedy on April 13, 2011


Previous post in series: SP&GM: Step Two – Create your SharePoint List

Next post in series: SP&GM: Step Four – Upload the JavaScript file [to be posted]

By this point you should have a populated SharePoint List. Now you need to create a web page that will be used to display the Google Map, and the data used to generate the map.

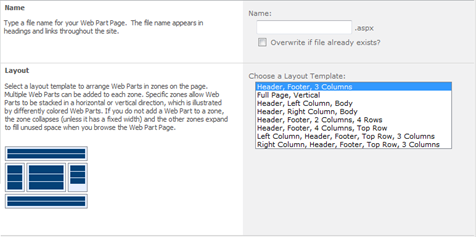
Create a new web part Web Page, in whatever Document Library you wish to use. With the Document Library selected click on ‘Documents’ in the Ribbon and then select ‘New Document’. In my case my Document Library has been setup to default to a web part Web Page. You should then see the following page;

image

Type in a name for the page and select a layout template that you want to use. I used the ‘Full Page, Vertical’ layout. Then click on ‘Create’.

Add DataView to the page

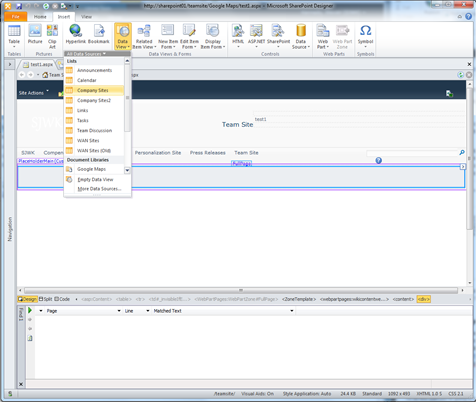
Go to the Document Library where you created the new web page. Select the page that you’ve just created and click on the ‘arrow’ to open the drop down menu. Select ‘Edit in Microsoft SharePoint Designer’. The page will then open in SharePoint Designer. The image below shows a page that I’ve opened, showing the ‘Design’ mode. Click inside the body of the page, it’ll highlight the placeholder, then click on ‘Insert’ and then ‘DataView’ in the Ribbon. A drop down will appear listing the various SharePoint Lists. Select the one you’ve created previously, in my case, as shown in the picture below, ‘Company Sites’.

image

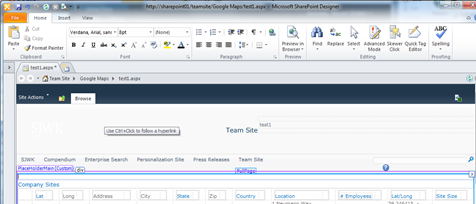
The SharePoint List will then be displayed on the page, something like that shown below.

image

Now ‘Save’ the page and exit SharePoint Designer.

We now have a web page with the SharePoint List inserted on to the page

Previous post in series: SP& GM: Step Two – Create your SharePoint List

Next post in series: SP&GM: Step Four – Upload the JavaScript file [to be posted]

Posted in Google, SharePoint | Tagged: , | Leave a Comment »

SP&GM: Step Two – Create your SharePoint List

Posted by Steven Kennedy on April 12, 2011


Previous post in series: SP&GM: Step One – Generate Lat/Long codes

Next post in series: SP&GM: Step Three – Create a new Web Page and add a DataView

You can either create a custom SharePoint List and manually enter the data or use an Excel file to create and populate the List.

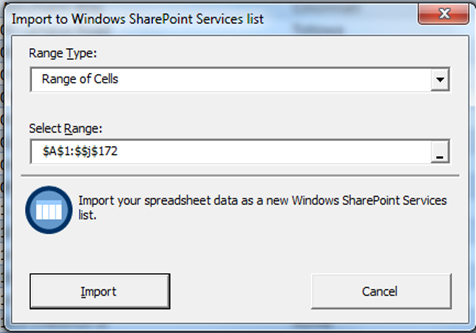
In my case I used an Excel spreadsheet to generate the SharePoint List. As I had just under 200 entries I didn’t want to manually load the data. Unfortunately in generating the SharePoint List this way you don’t have a great deal of control over the field types. If you use my sample JavaScript you’ll need to have the field names the same and have them in the same order and once in SharePoint the field types will need to be the same (you can add additional columns to the right of the field Lat/Long as this wont impact the sample code). It’s highly likely that not all of these requirements will be met so I’ll describe in a later post in this series how I identified the various elements in order to extract the relevant information to be used to generate the Google Map.

The next three pictures depict various screens used to create a SharePoint List from an Excel Spreadsheet.
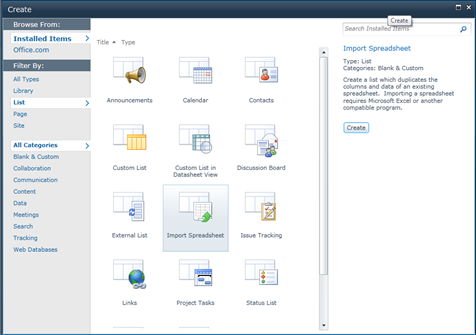
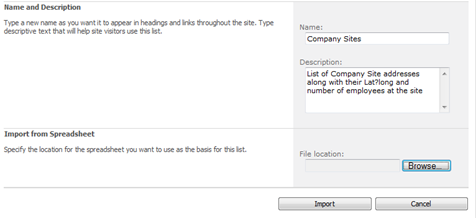
image

image

image

The picture below shows the various fields for my List, along with the field type. I’d also suggest at this time that you create a second view of the data, with a limited number of rows of data displayed. his will help during trouble shooting. If you have lots of data then each entry will be processed. By limiting the number of rows displayed we limit the number being processed. You could if you want just modify the default view to limit the number of items but I found it easier to have to separate views.

image_thumb[9]

Modify the Default view

The default ‘All Items’ view contains an  auto-generated column that we don’t need need so we’ll modify it to exclude it.

On the Ribbon select ‘List’ and then ‘List Settings’. Scroll to the bottom of the page and click on ‘All Items’, under the ‘Views’ heading. The ‘Columns’ section should be auto expanded, if not expand it. The first column listed should be ‘Attachments’. Uncheck the box next to it’s name and then click on ‘OK’.

Create a new View

Select the SharePoint List for which you want to create a new view. On the Ribbon select ‘List’ and then ‘List Settings’. Scroll to the bottom of the page and click on ‘Create view’. At the bottom of the page under the heading ‘Start from an existing view’ select All Items’. In the resulting dialog box type in a name for the view. I used ‘5 Records’. Scroll down to the bottom of the page and expand the section ‘Item Limit’. Set the ‘Number of items to display:’ to 5 and select the ‘Limit the total number of items …….’ radio button. Then select ‘OK’. You should then have a new view something like that shown below.

image_thumb[10]

Previous post in series: SP&GM: Step One – Generate Lat/Long codes

Next post in series: SP&GM: Step Three – Create a new Web Page and add a DataView

Posted in Google, SharePoint 2010 | Tagged: , | Leave a Comment »

SP&GM: Sample JavaScript

Posted by Steven Kennedy on April 11, 2011


First post in this series: SP & GM: Step One – Generate Lat/Long codes

A Word 2010 (.docx) version of the Example JavaScript, shown below, can be downloaded from here. You’ll need to open it in Word and then use ‘Save As’ to save it as a text (.txt) file.

Note! Replace the ‘<insert your own Google Maps API key here>’ with your own Google Maps API key. These can be obtained from Sign Up for the Google Maps API.

Posted in Google, SharePoint 2010 | Tagged: , | Leave a Comment »

SP&GM: Step One – Generate Lat/Long codes

Posted by Steven Kennedy on April 11, 2011


Previous post in series: Plotting SharePoint List Data on a Google Map – Part 2

Next post in series: SP&GM: Step Two – Create your SharePoint List

Using one of the Internet available sites generate a Lat/Long pair for each address that you have. In my case I had an Excel file with the addresses which I Cut & Pasted on to a site that generated the Lat/Long pairs. I used Batch Conversions of Address to Latitude/Longitude (Forward Geocoding) by Stephen P. Morse, but there are plenty around. I then took the resultant Lat/Long pairs and inserted them in to my Excel spreadsheet

I ended up with an Excel spreadsheet that looked something like this;

image

but with another 170 or so entries.

By going through this process, of generating the Lat/Long pairs, you can verify that the location information you’re using is accurate and that you get a good Lat/Long address. I found that in some cases the address I was using wasn’t entirely accurate. If the Address conversion cannot resolve the address it usually returns a 0,0. You can then investigate why. I found that in my case most of these were as a result of me using something like an ‘E’ in the address instead of ‘East’ etc.

Once you have the Excel spreadsheet save it for use in the next step.


Please note! that the example JavaScript that I provide in the post; SP&GM: Sample JavaScript, requires the Excel columns to be in the order shown in the picture above. In hindsight I didn’t really need the ‘Location’ column, that was a hold over from when I was using the Google Maps Geocode functionality.


Previous post in series: Plotting SharePoint List Data on a Google Map – Part 2

Next post in series: SP&GM: Step Two – Create your SharePoint List

Posted in Google, SharePoint 2010 | Tagged: , | 3 Comments »